Git and GitHub can feel confusing at first because you are managing changes in more than one place at the same time: your working files, your local Git history, your fork on GitHub, and the main repository maintained by a project. The goal of this chapter is to slow that process down and show the standard fork-and-pull-request workflow used by many repositories in the Policy Simulation Library (PSLmodels) organization.
Throughout this chapter, we refer to the main project repository as upstream and your personal fork as origin.
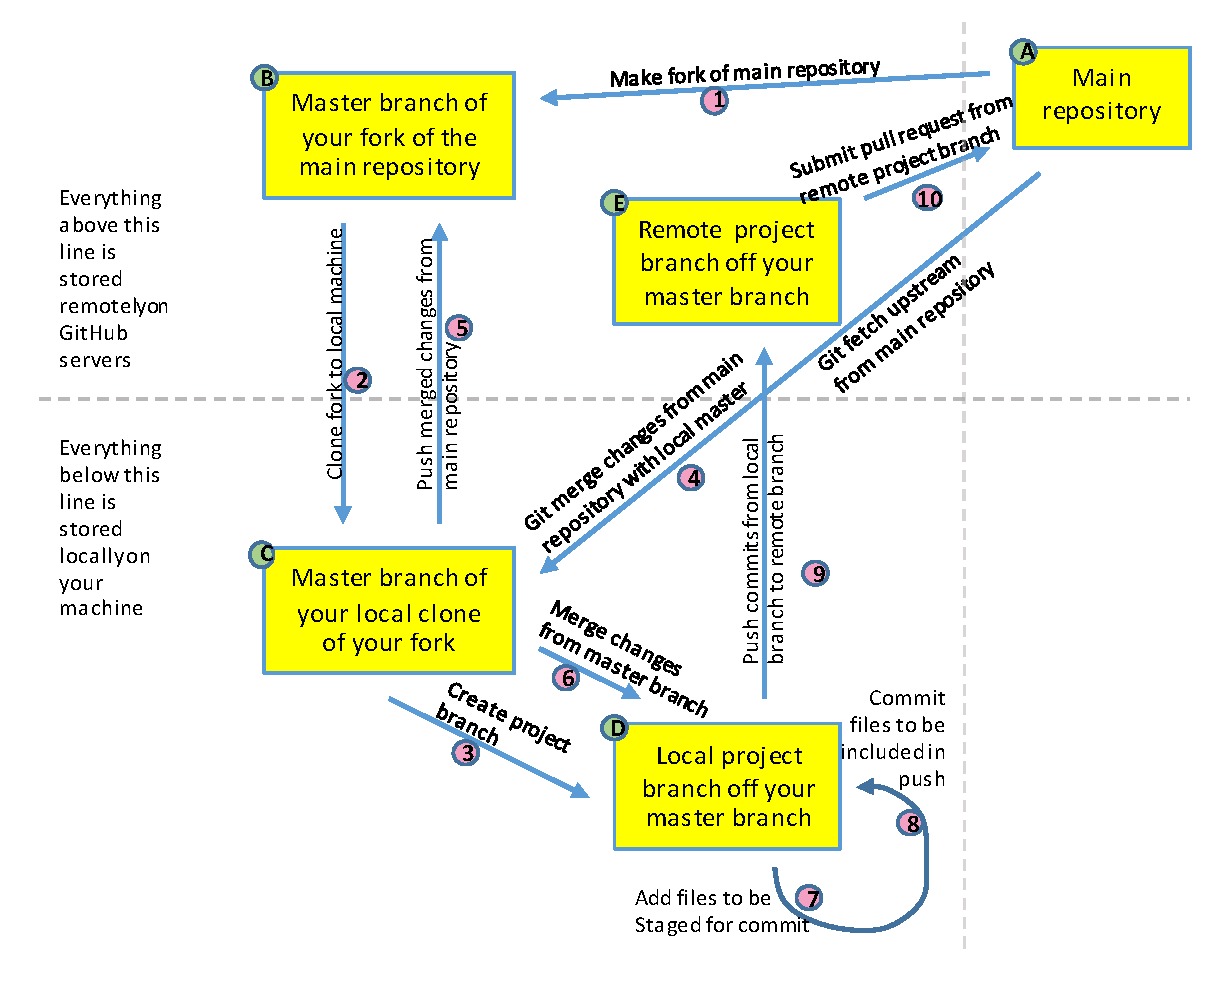
The workflow at a glance
In most PSLmodels repositories, a new contributor follows this cycle:
Fork the upstream repository on GitHub.
Clone the fork to your computer.
Add the upstream repository as a second remote.
Keep your local
mainbranch synchronized withupstream/main.Create a feature branch for your work.
Make changes, stage them, and commit them locally.
Push the branch to your fork on GitHub.
Open a pull request from your branch to the upstream repository.
Respond to review comments by adding more commits to the same branch.
After the pull request is merged, update your local
mainbranch and delete the temporary feature branch.
Step 1: Fork the main repository
Suppose you want to contribute to https://github.com/PSLmodels/project.
Go to that repository on GitHub and click the “Fork” button. GitHub will create a copy of the repository under your own account, for example:
upstream repository:
https://github.com/PSLmodels/projectyour fork:
https://github.com/yourname/project
Your fork gives you a place where you can push branches even if you do not have direct write access to the upstream repository.
Step 2: Clone your fork
Open a terminal and move to a directory where you want the project to live. Then clone your fork:
git clone https://github.com/yourname/project.git
cd project
At this point, Git has already created one remote for you:
git remote -vThat remote is usually named origin, and it points to your fork.
Step 3: Add the upstream remote
Because you cloned your fork rather than the main PSLmodels repository, you still need to tell Git where the upstream project lives:
git remote add upstream https://github.com/PSLmodels/project.git
git remote -v
After this, you should see both origin and upstream.
Step 4: Keep local main synchronized with upstream
Before starting new work, update your local main branch so that it matches the latest tested code from the main project.
git checkout main
git fetch upstream
git merge upstream/main
git push origin main
Some older repositories may still use master instead of main. If so, replace main with master in the commands above.
Many contributors prefer git pull --ff-only upstream main instead of separate fetch and merge commands. Both approaches are fine once you understand what they do. We separate them here because it makes the sequence easier to understand.
Step 5: Create a feature branch
Do not work directly on main. Create a branch for the change you want to make:
git checkout -b fix-typo-introChoose a branch name that briefly describes the task. Good names make it easier for reviewers and for your future self to understand what the branch is for.
Step 6: Edit, inspect, stage, and commit
Now make your changes in the files you want to update. While working, use git status often:
git statusWhen you are ready to record part of your work, stage the relevant file changes:
git add path/to/fileThen commit the staged changes:
git commit -m "Clarify glossary definitions for branch and commit"You can repeat the cycle of edit, git add, and git commit as many times as needed.
Step 7: Push the branch to your fork
Once your branch contains commits you want backed up or reviewed, push it to your fork:
git push origin fix-typo-introThe first time you push a new branch, GitHub will usually show a banner offering to open a pull request.
Step 8: Open a pull request
Open the pull request from your branch on your fork to the upstream repository’s main branch.
In practice, this usually means:
base repository:
PSLmodels/projectbase branch:
maincompare repository:
yourname/projectcompare branch:
fix-typo-intro
Write a PR title that states the change clearly. In the description, explain:
what you changed
why you changed it
anything a reviewer should pay special attention to
If the repository has a PR template, fill it out carefully. That template usually reflects the maintainers’ expectations.
Step 9: Respond to review and CI feedback
Opening the pull request is not the end of the process. In most collaborative repositories, three things happen next.
Review comments
Maintainers or other contributors may ask questions or request revisions. Make those changes locally on the same branch, then commit and push again:
git add path/to/file
git commit -m "Address PR feedback on workflow example"
git push origin fix-typo-intro
The pull request updates automatically.
Automated tests
Many repositories run continuous integration checks on every pull request. These checks might run unit tests, style checks, builds, or documentation validation. If a CI check fails, inspect the failure and update your branch until the checks pass.
Keeping the branch current
If the upstream repository changes while your PR is open, you may need to update your branch:
git checkout main
git fetch upstream
git merge upstream/main
git checkout fix-typo-intro
git merge main
More advanced contributors may prefer rebasing here, but merging main into your feature branch is often simpler for beginners.
Step 10: After the pull request is merged
Once your PR is merged, clean up your local repository.
First, update your local main branch:
git checkout main
git fetch upstream
git merge upstream/main
git push origin main
Then delete the feature branch locally:
git branch -d fix-typo-introYou can also delete the branch from your fork on GitHub, either through the GitHub interface or with:
git push origin --delete fix-typo-introWhat PSLmodels-style workflow is trying to protect
This workflow may seem elaborate for a one-line fix, but each part serves a purpose.
Forks let anyone propose changes without giving everyone write access to the main repository.
Branches isolate one task from another.
Pull requests create a clear place for review and discussion.
CI checks help catch bugs before they reach the default branch.
Keeping
mainclean ensures you always have a reliable branch to build from.
Those safeguards are especially valuable in research and policy-model repositories, where code, documentation, and results often need to be reproducible and carefully reviewed.
Common beginner mistakes
The following problems happen often and are normal parts of learning Git.
Working directly on
maininstead of a feature branch.Forgetting to add the
upstreamremote.Committing too many unrelated changes together.
Pushing to the wrong branch.
Opening a PR from
maininstead of from the feature branch.Trying to fix a failed CI check on GitHub without reproducing the problem locally.
The next chapters cover some of these topics in more detail, especially merge conflicts and pull request discussions.